PS 3500.R2.M.H Precision Balance
Radwag – Laboratory and Industrial Weighing Solutions
Selected language English
PS 3500.R2.M.H Precision Balance
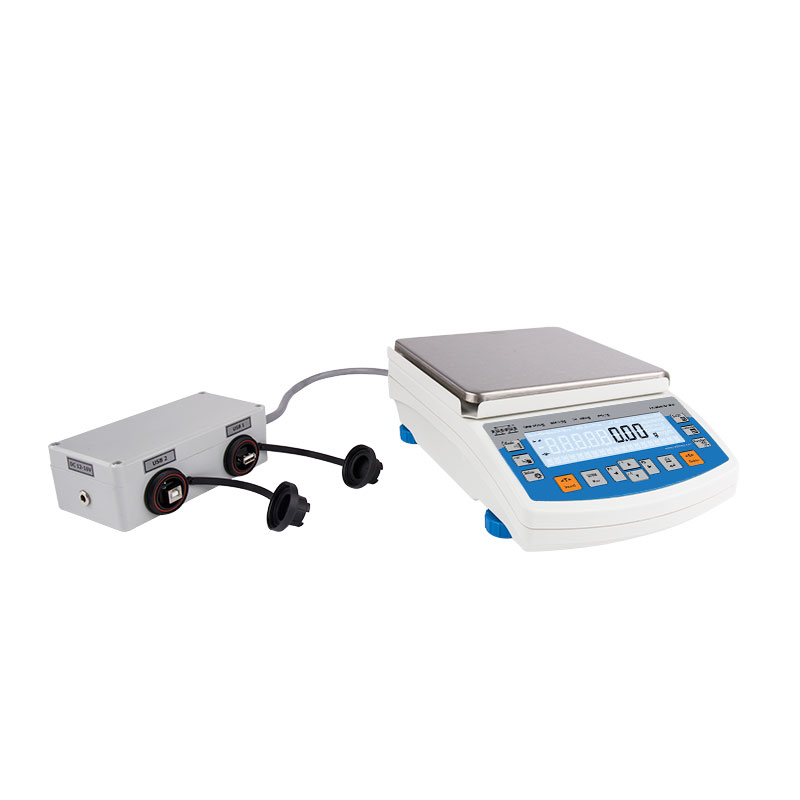
This image is for reference only.

PS 3500.R2.M.H Precision Balance

Product code: WL-221-0024
Change the model (10)
done
Max: 3500gd: 0,01g

 195×195mm
expand_more
Max: 200 / 2000gd: 0,001 / 0,01g

 ø100mm
Max: 210gd: 0,001g

 ø100mm
Max: 360gd: 0,001g

 ø100mm
Max: 600gd: 0,001g

 ø100mm
Max: 750gd: 0,001g

 ø100mm
Max: 1000gd: 0,001g

 ø100mm
Max: 2100gd: 0,01g

 195×195mm
Max: 4500gd: 0,01g

 195×195mm
Max: 6100gd: 0,01g

 195×195mm
Maximum capacity [Max]: 3500 g
Readability [d]: 0.01 g

close
Change the model:
PS 200/2000.R2.H Precision Balance
PS 210.R2.H Precision Balance
PS 360.R2.H Precision Balance
PS 600.R2.H Precision Balance
PS 750.R2.H Precision Balance
PS 1000.R2.H Precision Balance
PS 2100.R2.M.H Precision Balance
PS 3500.R2.M.H Precision Balance
PS 4500.R2.M.H Precision Balance
PS 6100.R2.M.H Precision Balance
Select all
Show me
Download
Add to compare Advanced search
Overview
 

PS 3500.R2.M.H Precision Balance

 
PS R2.H series balances redefine the level of standard precision balances. 
Not only do they share all the features of R series balances, but can also work in adverse operating conditions (condensed dust, drops of water falling down at different angles typical for IP 54).


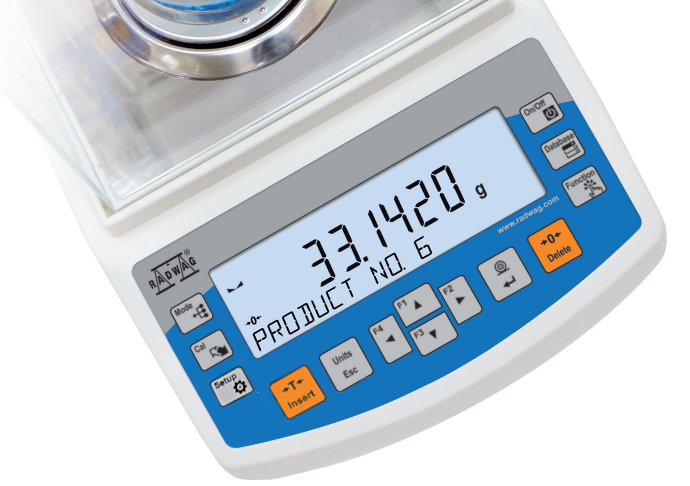
LCD display

These balances are equipped with innovative LCD display allowing for clear and legible presentation of a measurement result.

Moreover, it offers new text line which supplies the user with some additional messages and information, e.g. product name or tare value.


Interfaces

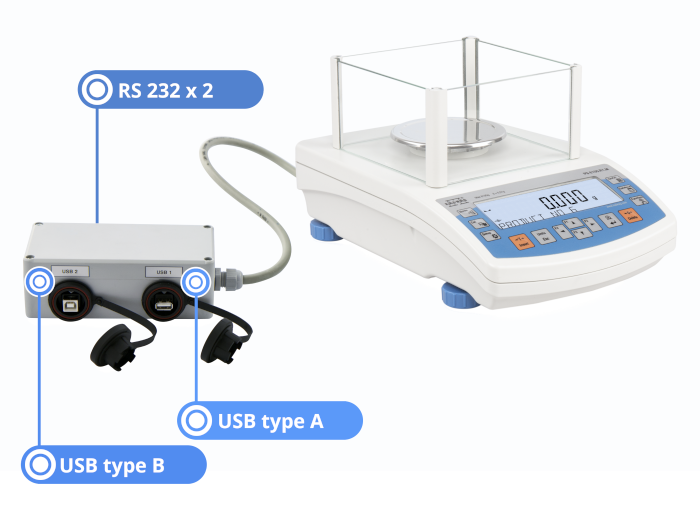
Additional asset of PS R2.H balances are their interfaces build-in a hermetic closed housing which is separated from the balance.

The interfaces include 2×RS 232, USB type A, USB type B, and Wireless Connection optionally.

Balance housing is made of plastic, whereas its pan of stainless steel.


Under-pan weighing
Weighing instruments purchased after 15th February 2023 will allow under-pan weighing at any time after the purchase. All you need to do is just to order a dedicated hook.
 
THBR 2.0 System
Cooperation with THBR 2.0 System for ambient conditions monitoring.


Stainless Steel in RADWAG products
Learn about the use and maintenance of stainless steel products:
Stainless Steel in RADWAG products. Standard and special applications

Check the price in our store

radwaguk.com

Buying from the producer is all about the pros

 
✓ Update as standard

You always get the latest version of the device and software. We are constantly improving our products.

✓ This is priceless

Technical support from the product developers. Who better to know the answers to your questions? Like our Facebook – profile – stay in touch with us.

✓ Smaller carbon footprint

A solidly packaged shipment travels only one way – the one to you.

✓ Long life for your balance

In our permanent offer you will find accessories for our balances and scales, such as cables, weighing pans and power supplies, as well as all spare parts. And we carry out legalization and periodic inspections in our laboratory.

✓ The important thing

You buy a product developed and manufactured in Europe – you get a device with a certain standard of compliance.

Datasheet
Maximum capacity [Max]

3500

 g

Minimum load

500

 mg

Readability [d]

0.01

 g

Tare range

-3500

 g

Repeatability (Max)

0.008

 g

Repeatability (5% Max)

0.005

 g

Linearity

±0.02

 g

Stabilization time

1.5

 s

Adjustment

internal (automatic)


Leveling system

manual


Display

LCD (backlit)


Delivery components

Balance, weighing pan, weighing pan shield, power supply


Weighing pan dimensions

195×195

 mm

Packaging dimensions

475×380×345

 mm

Net weight

3.6

 kg

Gross weight

5.1

 kg

Protection class

IP 54


Communication interface

2×RS232¹, USB-A, USB-B, Wi-Fi® (option)


Power supply

Adapter: 100 – 240V AC 50/60Hz 0.6A; 12V DC 1.2A
Balance: 12 – 15V DC 0.4A max


Power consumption

4 W


Operating temperature

+10 – +40

 °C

Relative humidity

40% – 80%


CE
Repeatability is expressed as a standard deviation from 10 weighing cycles.
Stabilization time depends on the ambient conditions and the dynamics of weighing pan loading; specified for FAST profile.
1 Barcode scanners, available as weighing instrument accessory, communicate with the instrument via RS232 interface exclusively.
Videos
Easy Printing with Wi-Fi® Thermal Receipt Printer by RADWAG.
Connecting RADWAG RTP-UEW80 Printer via Wi-Fi® (Tutorial)
PS R2 Precision Balance Unpacking and Installation (Tutorial)
RTP - The First Receipt Printer of RADWAG Production!
Complete Solutions for Mass Measurement in Pharma Industry
R Series Laboratory Balances
Functions
Autotest

Autotest

Diagnostic function aiming at metrological parameters determination (repeatability), the parameters are determined for the actual conditions of use. When speaking of repeatability it may be also used for weighing time optimization. Autotest is operated in an automatic mode thus operator’s time is saved.
Dosing

Dosing

Weighing process for which reference mass has been determined together with tolerance for its determination. Dosing tolerance is given in [%] and it is calculated in relation to the reference value thus being a permissible deviation of this process. This solution is used for weighing powders, liquids and loose materials. Dosing function performance is often supported with bargraph - load indicator. For industrial scales it is possible to use a control systems of dosing process.
Percent Weighing

Percent Weighing

Percent Weighing function is used for comparision of measured products with mass standard. Mass of a mass standard may be a numeric value taken from a database or it may be determined through a measurement process. Each measured product is compared to mass standard, mass of which is presumed as a model 100% ideal mass. For products weighing less than the mass standard, obtained results are lower than 100%, for products weighing more, the obtained results are greatly  exceeded.
Totalizing

Totalizing

Function adding new mass value to already obtained one. This allows to determine mass content of the mixture, being a composition of number of different consistence components. Totalizing is limited by maximum capacity parameter.
Parts counting

Parts counting

Function using mass measurement for determination of  measured items quantity. Mass of a single item is required for this process. It may be either estimated through weighment or taken from a database. For items counting the following algorithm is used: all items mass / single item mass = quantity. Function operation is supperted by a mechanism of Automatic Correction of Accuracy. This allows to update single item mass in course of the process. To a certain extend Automatic Correction of Accuracy eliminates error which may be a result of different mass values of seemingly alike single elements. For industry solutions items counting may be simultaneously carried out with checkweighing and dosing thus industry solutions feature audio signalling base informing that specified number of items has been weighed. It is possible to apply weighing systems using few platfroms of different MAX capacities and different accuracies.
Peak hold

Peak hold

Function registering the greatest temporary indication occurring in course of the weighing process. It is most often used in medical scales in order to hold the measurement indication.
Statistics

Statistics

Statistiscs function registers and analyses performed measurements. This supplies the user withthe following information: Max and Min standard deviation, average value, variance, range et.
Checkweighing

Checkweighing

Checkweighing function is used for checking whether the measured sample mass is within the predefined threshold values, Low [LO] and Hgh [HI]. The thresholds are given in [g] and [kg] units. Current state of a sample being measured is signalled by means of pictorgams located on a display for laboratory balances, for industrial scales Stackligt System is used. This visual +/- inspection is in operation during segregation, control or packing process of products for which mass has bees determined with a specifaied tolerance, eg. 12860 g 961
Under-pan weighing

Under-pan weighing

The solution enables weighing with use of a stand, which is advisable for loads of non-standard shapes and dimensions and those that generate magnetic field.
GLP Procedures

GLP Procedures

Diagnostic function allowing to objectively document performed measurements. GLP procedures may be either presented in a short report form or extended one.
Animal weighing

Animal weighing

Process of mass determination for a product which may unwillingly reposition within the weighing pan. Mass determination in such cases requires much longer period of time when compared to typical weighing process. It is the user who defines period of time needed for control of measured product mass. The user can thus optimize the function depending on the measured product characteristics.
Density determination

Density determination

Liquid or solid body density function uses the Archimedes principle and it requires a special kit to be applied. The kit when used, replaces a weighing pan. For solids mass of the sample must be determined first in the air, next in the liquid of specified density. For liquids the so called sinker, density of which has been determined, must be measured first in the air, next in the tested liquid. The density determination process is disturbed by air bubbles which may stick either to the measured sample or the sinker. In case of laboratory equipment very light solids may be measured. For industry, solid bodies density may be determined by means of  under-pan weighing. Tested load of significant size may be measured this way.
Documentation
Datasheet
Data Sheet Data Sheet
Data Sheet

Show me
Show me
Download
Download

Choose more product:
Show me Show me DownloadDownload
User Manuals
User Manual - R Series balances
Show me
Show me
Download
Download
(14.52 MB)
Start up Guide
Start up Guide
Show me
Show me
Download
Download
(11.76 MB)
Conformity Declarations
Conformity Declaration
Show me
Show me
Download
Download
(0.04 MB)
Publications and Brochures
Laboratory balance cleaning
Show me
Show me
Download
Download
(2.52 MB)
RTP Thermal Receipt Printer
Show me
Show me
Download
Download
(1.64 MB)
USB Free Link - Direct Balance-PC Communication
Show me
Show me
Download
Download
(2.07 MB)
Alibi Reader - tutorial
Show me
Show me
Download
Download
(1.47 MB)
Stainless Steel in RADWAG products. Standard and special applications
Show me
Show me
Download
Download
(2.23 MB)
Metrology in the laboratory 2024
Show me
Show me
Download
Download
(5.65 MB)
Defined Weighing Profiles
Show me
Show me
Download
Download
(1.36 MB)
R Series balances
R Series balances
Show me
Show me
Download
Download
(4.98 MB)
Download
Drivers

RADWAG USB DRIVER 1.6.2 (1.25 MB)

Accessories
R-LAB

Accessories

Radwag Balances and Scales
Torunska 5
26-600 Radom
Poland
tel.: +48 48 386 60 00
e-mail: export@radwag.com
TIN: PL7960000327
Vimeo Radwag YouTube Radwag Facebook Radwag LinkedIn Radwag
© 2024 RADWAG Balances and Scales. All rights reserved.

Select language

×
Change language AlbanianAlbanian
Change language DanishDanish
Change language NederlandseNederlandse
Change language EstonianEstonian
Change language FinnishFinnish
Change language HungarianHungarian
Change language IcelandicIcelandic
Change language KazakhKazakh
Change language LatvianLatvian
Change language LithuanianLithuanian
Change language MacedonianMacedonian
Change language NorwegianNorwegian
Change language PortuguesePortuguese
Change language RomanianRomanian
Change language RussianRussian
Change language SlovakSlovak
Change language SlovenianSlovenian
Change language SwedishSwedish
Change language UkrainianUkrainian
Change language SerbianSerbian
Change language MontenegrinMontenegrin
Change language page on Deutsch Deutsch
Change language page on Español Español
Change language page on Français Français
Change language page on Italiano Italiano
Change language page on Polski Polski
Change language page on Türkiye Türkiye
Česky
Português (Brasil)
Change website to USA USA
Change language page on 中文 中文
Presentations Presentations Presentations
Subscribe Subscribe Subscribe
Radwag in Facebook Radwag in Facebook Facebook
Radwag in YouTube Radwag in YouTube Youtube
Radwag in Vimeo Radwag in Vimeo Vimeo
Radwag in LinkedIn Radwag in LinkedIn LinkedIn
Webinars Radwag Webinars Radwag Webinars
close
E-mail:
Company name:
Name:
I consent to the processing of my personal data for marketing purposes by Radwag Wagi Elektroniczne Witold Lewandowski.
I consent to receive marketing and product-related messages by electronic means from Radwag Wagi Elektroniczne Witold Lewandowski.
I have read the Privacy Policy of RADWAG Wagi Elektroniczne Witold Lewandowski.
lock_openI want to access the files
close
Slide to go back ↩