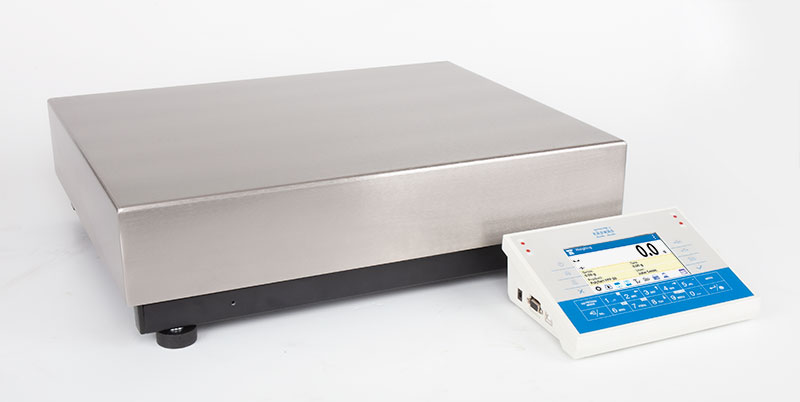
Bilancia di precisione C32.60.PM

Radwag Bilance e sistemi di pesatura
Selected language Italiano
Obraz
This image is for reference only.

Bilancia di precisione C32.60.PM

Codice prodotto: WL-223-0081
Modifica del modello (8)
done
Max: 60kgd: 0,1g

 400×500mm
expand_more
Max: 10kgd: 0,01g

 200×185mm
Max: 15kgd: 0,01g

 200×185mm
Max: 25kgd: 0,1g

 350×260mm
Max: 35kgd: 0,1g

 350×260mm
Max: 60kgd: 1g

 400×500mm
Max: 60kgd: 0,5g

 400×500mm
Max: 120kgd: 0,2g

 400×500mm
Portata massima [Max]: 60 kg
Divisione [d]: 0,1 g

close
Modifica del modello:
Bilancia di precisione C32.10.PM
Bilancia di precisione C32.15.PM
Bilancia di precisione C32.25.PM
Bilancia di precisione C32.35.PM
Bilancia di precisione C32.60.PM.1
Bilancia di precisione C32.60.PM.05
Bilancia di precisione C32.60.PM
Bilancia di precisione C32.120.PM
Select all
Vista
Salva
Aggiungere a confrontare
Caratteristiche generali
 

Bilancia di precisione C32.60.PM

 
PM Balances by RADWAG – Laboratory Precision Under Industrial Conditions


 Mono BLOCK® technology

The ability to weigh loads up to 120 kg on a large weighing pan with high accuracy and good repeatability,
  • minimum eccentricity error over the entire range, 
  • quick and stable measurement (achievable within 1 second),
  • parameter stability over time and during transport,
  • weighing pan dimensions adapted to the accuracy of the balance 
are the distinguishing features of RADWAG PM balances. All of this is possible thanks to the use of a cutting-edge measuring system based on RADWAG’s enhanced

MONO

BLOCK® technology.
 
The change in the design of the has made it possible to work with a readability of 0.01 g at a maximum capacity of 20 kg and 0.2 g at a maximum capacity of 120 kg, with a repeatability of 0.01 g, and resistance to changes in ambient conditions.


PM balances also include:

  • robust design based on a larger and taller Monoblock,
  • built-in 4-point overload protection system,
  • IP 43 ingress protection,
  • internal adjustment,
  • 5" colour display,
  • easy start-up, intuitive operation, and ergonomics.
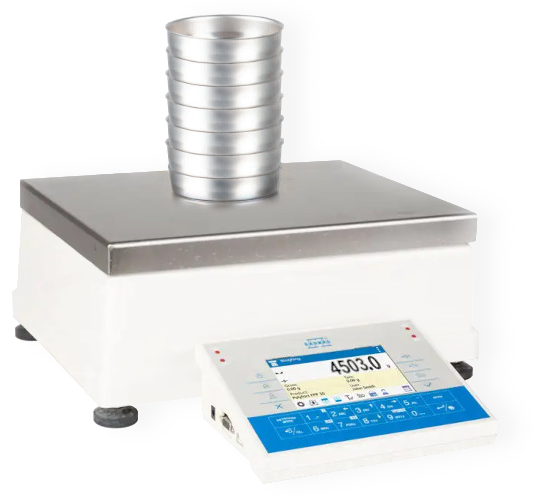


Application 

PM balances not only provide an accurate reading and quick measurement, but they are also versatile, allowing them to be used in a variety of industrial sectors.

Dosing, formulation-making, and parts counting are just some of the possible applications of these multi-purpose devices.

PM balances will find use wherever high-accuracy, high-load-capacity weighing equipment is required.


THBR 2.0 System
Cooperation with THBR 2.0 System for ambient conditions monitoring.


Stainless Steel in RADWAG products
Learn about the use and maintenance of stainless steel products:
Stainless Steel in RADWAG products. Standard and special applications
Specifiche
Portata massima [Max]

60

 kg

Portata minima [Min]

5

 g

Intevallo di precarico

6

 kg

Divisione [d]

0,1

 g

Intervallo di verifica della bilancia [e]

1

 g

Campo di tara

-60

 kg

Portata minima (secondo USP)

82

 g

Portata minima (U=1%,k=2)

8,2

 g

Ripetibilita (Max)

0,15

 g

Ripetibilita (5% Max)

0,041

 g

Linearità

±0,3

 g

Tempo di stabilizzazione

1

 s

Calibrazione

internal (automatic)


Classe OIML

II


Sistema di livellamento

manual


Display

5” graphic colour


Dimensione piatto

400×500

 mm

Dimensioni del pacco

710×610×240

 mm

Peso netto

22

 kg

Peso lordo

26

 kg

Punteggio IP

IP 43


Interfaccia

2×RS232, USB-A, USB-B, Ethernet, 4 IN / 4 OUT (digital), Wi-Fi®


Alimentatore

Adapter: 100 – 240V AC 50/60Hz 0,6A; 12V DC 1,2A
Balance: 10 – 12V DC 1A max


Ambiente di lavoro

+10 – +40

 °C

CE
Verifica Extra payment
for verification
La ripetibilità è espressa come deviazione standard di 10 posizionamenti dello standard di massa.
Il tempo di stabilizzazione dipende dalle condizioni esterne e dalla dinamica di posizionamento del carico sul piatto; specificato per il profilo FAST.
Precarico - valore pari al ±10% del carico massimo [Max] della bilancia legalizzata. È possibile avviare la bilancia con la massa posta sul piatto pari al valore di precarico massimo.
360°
Video
Stampa facile con l’RTP-UEW80 con Wi-Fi®®
Complete Solutions for Mass Measurement in Pharma Industry
Funzioni
Labelling

Labelling

Marking products with the right symbols contributes to quick and reliable identification. The balance/scale usually transfers product mass or product quantity to the label printer. The transferred value is printed with the following information: bar code, pictogram, content, address etc. In laboratory the labelling is performed in a semi-automatic mode, for industry in an automatic one (dynamic scales).
Plus/Minus Control

Plus/Minus Control

Control of sample's mass carried out with reference to specified MIN and MAX thresholds. The weight is considered to be correct if it is comprised within threshold values. A graphic visualisation of weighing result is displayed in a form of a bar graph.
Percent Weighing

Percent Weighing

Percent Weighing function is used for comparision of measured products with mass standard. Mass of a mass standard may be a numeric value taken from a database or it may be determined through a measurement process. Each measured product is compared to mass standard, mass of which is presumed as a model 100% ideal mass. For products weighing less than the mass standard, obtained results are lower than 100%, for products weighing more, the obtained results are greatly  exceeded.
Totalizing

Totalizing

Function adding new mass value to already obtained one. This allows to determine mass content of the mixture, being a composition of number of different consistence components. Totalizing is limited by maximum capacity parameter.
Parts counting

Parts counting

Function using mass measurement for determination of  measured items quantity. Mass of a single item is required for this process. It may be either estimated through weighment or taken from a database. For items counting the following algorithm is used: all items mass / single item mass = quantity. Function operation is supperted by a mechanism of Automatic Correction of Accuracy. This allows to update single item mass in course of the process. To a certain extend Automatic Correction of Accuracy eliminates error which may be a result of different mass values of seemingly alike single elements. For industry solutions items counting may be simultaneously carried out with checkweighing and dosing thus industry solutions feature audio signalling base informing that specified number of items has been weighed. It is possible to apply weighing systems using few platfroms of different MAX capacities and different accuracies.
Statistics

Statistics

Statistiscs function registers and analyses performed measurements. This supplies the user withthe following information: Max and Min standard deviation, average value, variance, range et.
IR sensors

IR sensors

Programmable function supporting the weighing process through control of the following options: sliding weighing chamber doors, printout, zeroing, tarring etc. Especially appreciated wherever preventing the balance from soiling is important.
GLP Procedures

GLP Procedures

Diagnostic function allowing to objectively document performed measurements. GLP procedures may be either presented in a short report form or extended one.
Animal weighing

Animal weighing

Process of mass determination for a product which may unwillingly reposition within the weighing pan. Mass determination in such cases requires much longer period of time when compared to typical weighing process. It is the user who defines period of time needed for control of measured product mass. The user can thus optimize the function depending on the measured product characteristics.
Density determination

Density determination

Liquid or solid body density function uses the Archimedes principle and it requires a special kit to be applied. The kit when used, replaces a weighing pan. For solids mass of the sample must be determined first in the air, next in the liquid of specified density. For liquids the so called sinker, density of which has been determined, must be measured first in the air, next in the tested liquid. The density determination process is disturbed by air bubbles which may stick either to the measured sample or the sinker. In case of laboratory equipment very light solids may be measured. For industry, solid bodies density may be determined by means of  under-pan weighing. Tested load of significant size may be measured this way.
Replaceable unit

Replaceable unit

Replaceable units.
ALIBI Memory

ALIBI Memory

"ALIBI" memory enables saving and storing up to 100000 measurements.  Measurements are saved automatically upon each pressing of the key. There is no need for any additional operations or changing settings.
The following data related with the measurements is saved: measurement date; measurement time; result (mass); tare value; operator carrying out the measurement (logged in); product name.
The software saves the measurement in a so called loop, i.e. when the measurement no. 100001 is saved, the measurement 1 gets automatically deleted from the memory.
Measurements saved to balance memory cannot be deleted.
You can preview and print out the data saved to the ALIBI database.
Documentazione
Data Sheet Data Sheet
Data Sheet

Vista
Vista
Salva
Salva

Choose more product:
Vista Vista SalvaSalva
Start up Guide
Start up Guide
Vista
Vista
Salva
Salva
(1.69 MB)
User Manual - PM
User Manual - PM
Vista
Vista
Salva
Salva
(5.39 MB)
Software Manual - Appendices 02
Vista
Vista
Salva
Salva
(0.99 MB)
Conformity Declaration
Vista
Vista
Salva
Salva
(0.04 MB)
Laboratory balance cleaning
Vista
Vista
Salva
Salva
(2.52 MB)
RTP Thermal Receipt Printer
Vista
Vista
Salva
Salva
(1.64 MB)
PM Precision Balances
Vista
Vista
Salva
Salva
(5.47 MB)
Laboratory Balances
Laboratory Balances
Vista
Vista
Salva
Salva
(1.68 MB)
Stainless Steel in RADWAG products. Standard and special applications
Vista
Vista
Salva
Salva
(2.23 MB)
Metrology in the laboratory 2024
Vista
Vista
Salva
Salva
(5.65 MB)
Software
Drivers

RADWAG USB DRIVER 1.6.2 (1.25 MB)

Accessori
Radwag bilance e sistemi di pesatura
Torunska 5
26-600 Radom
Poland
tel.: +48 48 386 60 00
e-mail: export@radwag.com
TIN: PL7960000327
Vimeo Radwag YouTube Radwag Facebook Radwag LinkedIn Radwag
© 2024 Radwag bilance e sistemi di pesatura. Diritti riservati

selezionare

×
Change language AlbanianAlbanian
Change language DanishDanish
Change language NederlandseNederlandse
Change language EstonianEstonian
Change language FinnishFinnish
Change language HungarianHungarian
Change language IcelandicIcelandic
Change language KazakhKazakh
Change language LatvianLatvian
Change language LithuanianLithuanian
Change language MacedonianMacedonian
Change language NorwegianNorwegian
Change language PortuguesePortuguese
Change language RomanianRomanian
Change language RussianRussian
Change language SlovakSlovak
Change language SlovenianSlovenian
Change language SwedishSwedish
Change language UkrainianUkrainian
Change language SerbianSerbian
Change language MontenegrinMontenegrin
Change language page on Deutsch Deutsch
Change language page on English English
Change language page on Español Español
Change language page on Français Français
Change language page on Polski Polski
Change language page on Türkiye Türkiye
Česky
Português (Brasil)
Change website to USA USA
Change language page on 中文 中文
Presentations Presentations Presentations
Subscribe Subscribe Subscribe
Radwag in Facebook Radwag in Facebook Facebook
Radwag in YouTube Radwag in YouTube Youtube
Radwag in Vimeo Radwag in Vimeo Vimeo
Radwag in LinkedIn Radwag in LinkedIn LinkedIn
Webinars Radwag Webinars Radwag Webinars
close
E-mail
nome azienda:
Nome:
I consent to the processing of my personal data for marketing purposes by Radwag Wagi Elektroniczne Witold Lewandowski.
I consent to receive marketing and product-related messages by electronic means from Radwag Wagi Elektroniczne Witold Lewandowski.
I have read the Privacy Policy of RADWAG Wagi Elektroniczne Witold Lewandowski.
lock_openI want to access the files
close
Slide to go back ↩